Setting up BlueJ on your university computer account
Author: Peter Kenny (adapted for COMP3200)
BlueJ is already installed on university PCs but some setting up is
necessary for the practical classes.
These setup notes were written by Peter Kenny for CO881 and have been
adapted for COMP3200.
Therefore, any references to CO881 in figures, for instance,
must be substituted with references to COMP3200.
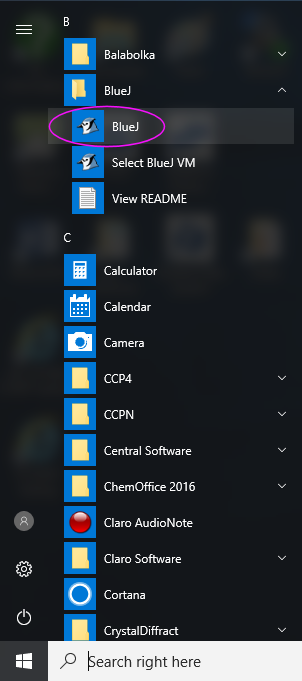
1) Create a shortcut on your desktop
This section describes how to create a shortcut for BlueJ on the Windows
desktop.
- Click the Windows start icon (bottom left corner of screen).
- Scroll down to BlueJ and open the folder.
- Drag the BlueJ icon to an empty space on the desktop.
2) Map the file server raptor to network drive X
The School of Computing has a server called raptor which provides
personal file space for students and holds teaching materials for various
modules. This section explains how to make raptor available as a
network drive in Windows.
- Right click the
Windows start icon and select File Explorer.
A window will appear like that below.
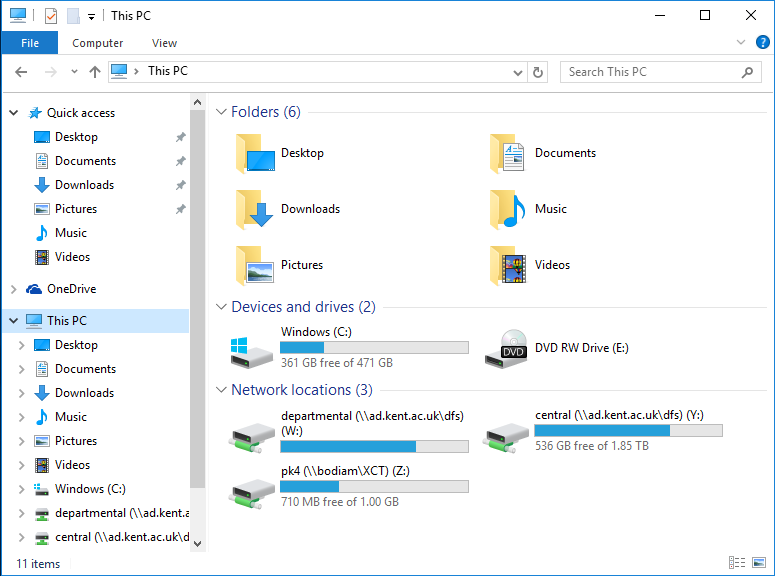
- Select This PC.
- Select Computer from the menu bar.
- Select Map network drive from the toolbar that appears.
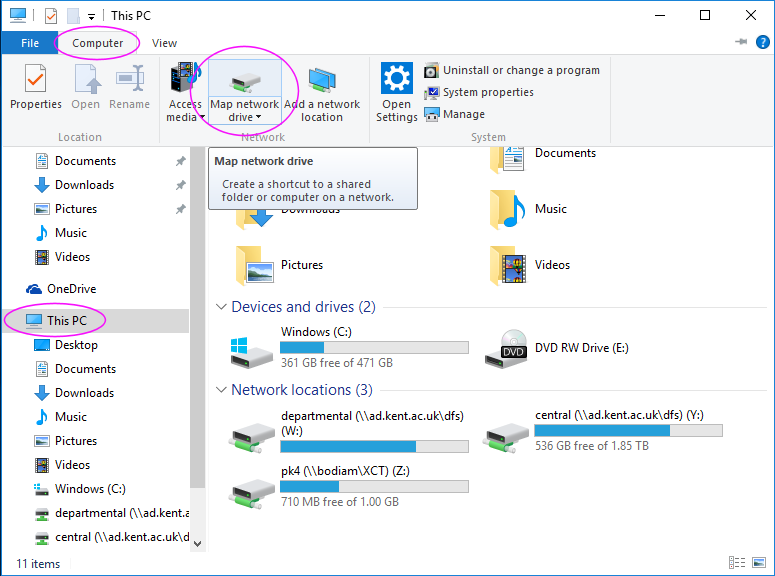
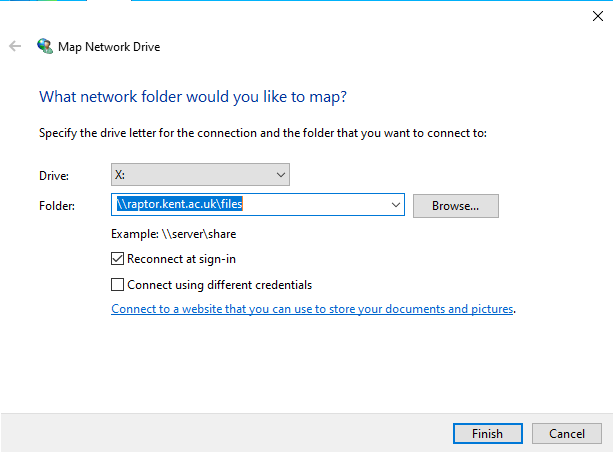
- In the pop-up window, use the pull-down menus to set the drive to
X: and the folder to
\\raptor.kent.ac.uk\files .
- Ensure Reconnect at sign-in is ticked and click Finish.
- A new window like the one pictured for the next step will appear.
- If prompted for your user name and password, use
ukc\xyz for the user name (where xyz is should
be replaced with your user name) and your Windows password.
- If the above steps don't work it may mean your raptor account hasn't
been created yet. Please notify the class supervisor so they can arrange for
this to be fixed.
3) Copy BlueJ projects to your personal file space
Practical classes will involve projects from the book. These are available on
raptor in the folder courses/comp3200. However, in order to work on the
projects you must first copy them to your personal file space which is located
in the home folder. Note that courses/comp3200 is a public folder which
everyone can read but only lecturers can modify. In contrast, each student has
their own private home folder which only they can access.
- Launch File Explorer as described above (or re-use the instance
created earlier).
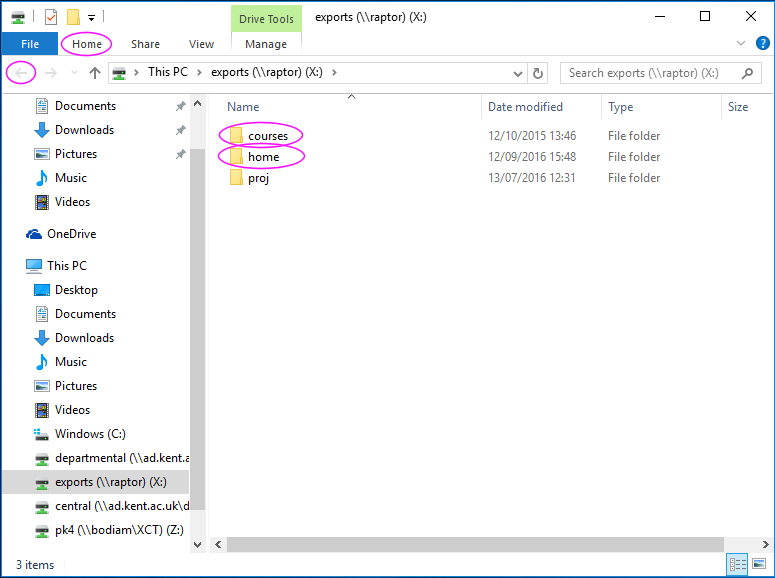
- Double click on the courses folder. The window contents
will change to show a long list of subfolders for various courses.
- Scroll down and click just once on folder
comp3200 to
highlight it.
- Select Home from the menu bar (top, not right panel) then
Copy from
the toolbar that appears.
- Return to the top level of X: (as pictured above) by clicking on the
left arrow icon (near the top left corner).
- Double click on the home folder (right panel, not menu
at top).
- Select Home from the menu bar (top) then Paste from
the toolbar that appears.
- The entire comp3200 folder will be copied to your personal file space. This
may take several minutes if many people are copying files at the same time.
If you get bored waiting for it to finish you can make a start on the next
section while the files are copying over.
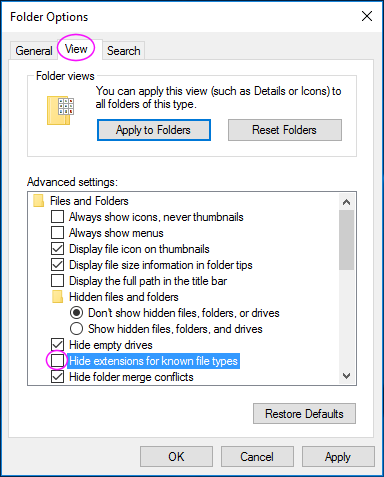
4) Filename extensions
File Explorer hides file extensions by default. For example, a Word document
"report.docx" is listed simply as "report". This can be confusing when working with
programming languages because source and compiled files often share
the same name but with different extensions (e.g. Project.java and
Project.class). It's difficult to distinguish between them if extensions aren't
shown.
So, to save grief later, we suggest you fix this now.
- Launch File Explorer (or re-use the instance created earlier).
- Select File from the menu bar (top) then
Change folder and search options from the toolbar that appears.
- A panel like that shown below will appear.
- Select the View tab.
- Find Hide extensions for known file types in the
Advanced settings section. If there's a tick in the box
then clear it.
- Click Apply then OK.
5) Check BlueJ is working correctly
This section helps you verify that BlueJ is set up correctly on your
university computer account.
- Double click the BlueJ icon on your desktop. The first time you run BlueJ, you'll see an invitation to participate in research
(it is entirely up to you whether to do this or not). Shortly after, a window like this will appear:
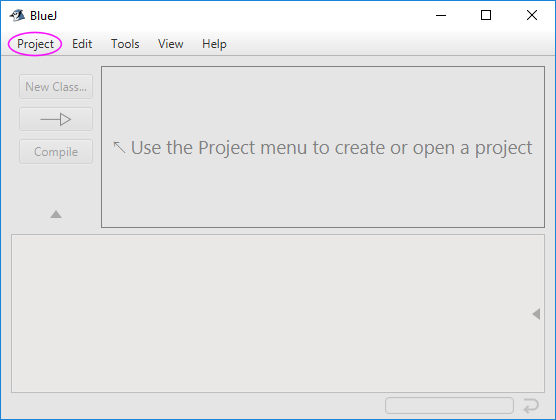
- Click on Project - Open Project.
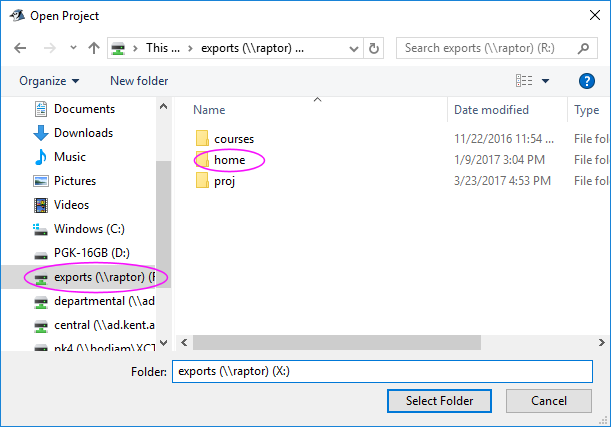
- Select This PC - exports (\\raptor) (X:)
in the folder panel on the left
- Navigate to home/comp3200 to get the BlueJ projects
you copied earlier.
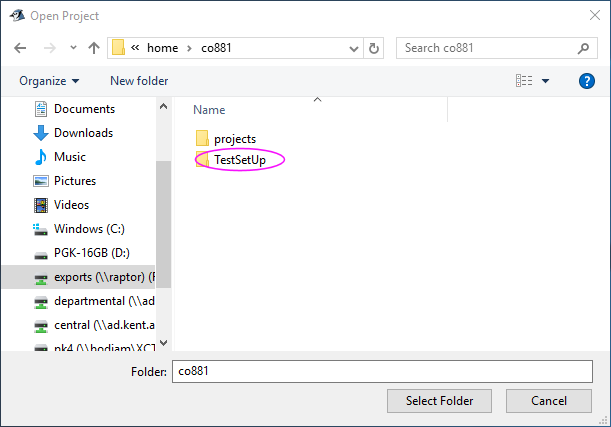
- Single click TestSetUp and then Select Folder.
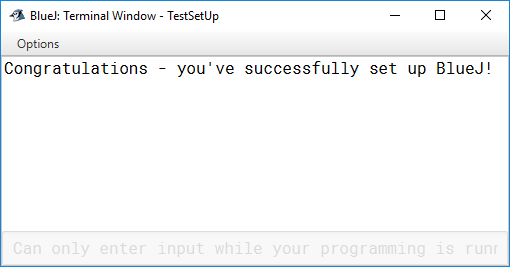
- You should get the following window:
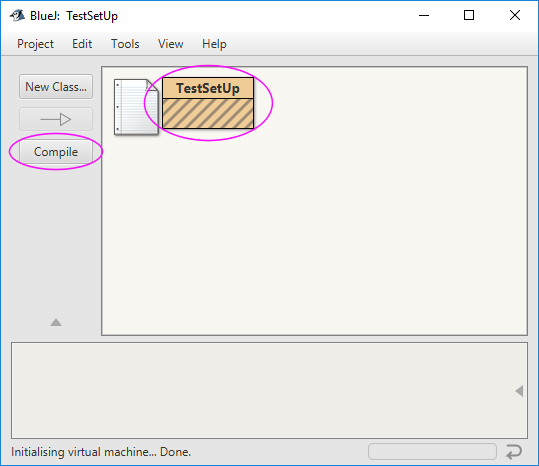
- The diagonal lines in the TestSetUp box indicate this class
hasn't been
compiled yet.
- Click the Compile button and the diagonal lines should
disappear, as in
the window below:
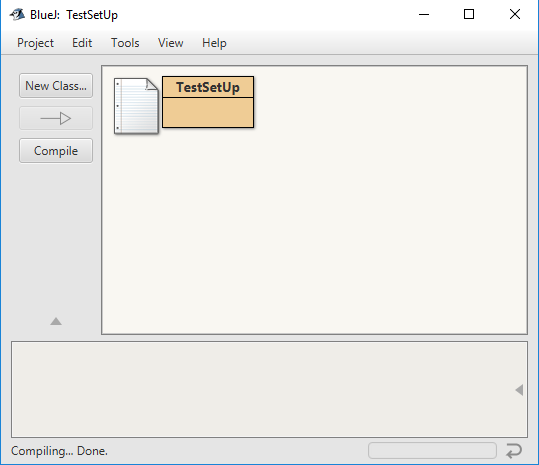
- If the compilation fails and the diagonal lines don't vanish then
you may have accidentally opened the project in the public folder
courses/comp3200 rather than your personal copy in
home/comp3200.
This won't work because new files are created when a project is compiled and
students can't alter the courses/comp3200 master folder. Please ask a
supervisor for assistance if you're unable to resolve the problem yourself.
- If you have a window like that above, then
right click on the TestSetUp box
to get the class pop-up menu:

- Left click on the line
new TestSetUp to
create a new TestSetUp object:
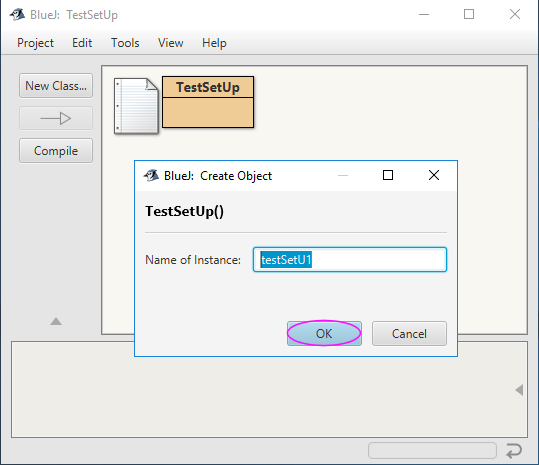
- You're almost there now. Click Ok and you should get:
- If all the above worked then you're ready to start using BlueJ.
- Please read the remaining sections before closing BlueJ.
6) Navigating to the exercise projects
This section illustrates how to open the projects you'll be using in the laboratory sessions. You can either take a look at
it now or later, when you start working on the exercises.
- Click Project - Close to close the TestSetUp
project.
- Click Project - Open Project and navigate to the folder
home/comp3200/projects. You should
get to the following window:
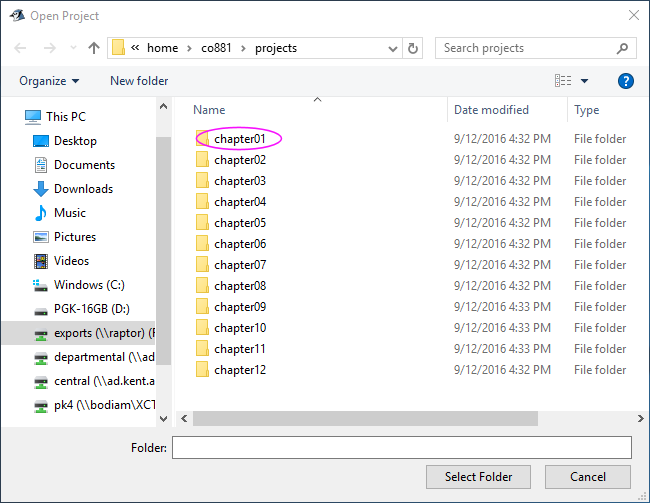
- There's a folder for each chapter in the book.
- Double click on chapter01 to list the projects in Chapter 1:
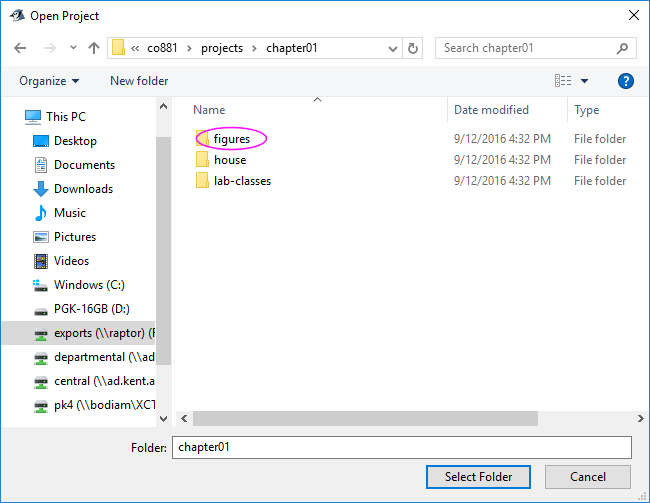
- Single click figures and then Select Folder
to open the figures project.
(Take care not to apply Select Folder to the chapter01
parent folder or strange things will happen!)
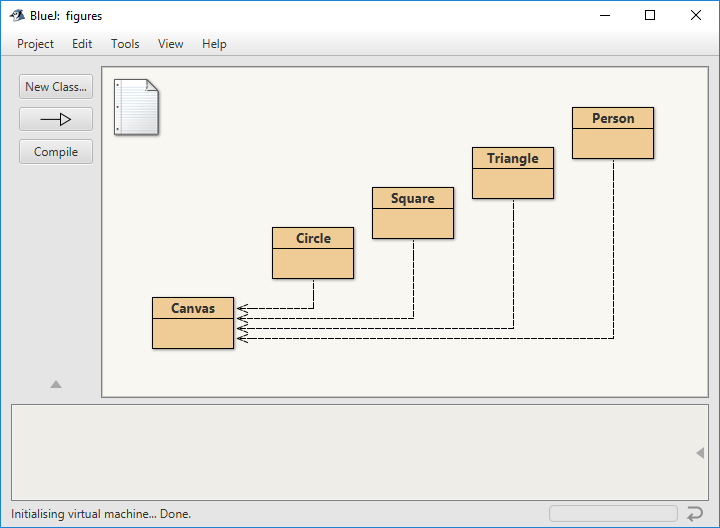
- You now have an open project to work with. Don't do anything now. You'll return to it in a later lab session.
7) Optional BlueJ settings
Several features of BlueJ can be configured by the user according to their preferences.
- Select the Tools pull-down menu then choose preferences. A
window like this will pop up:
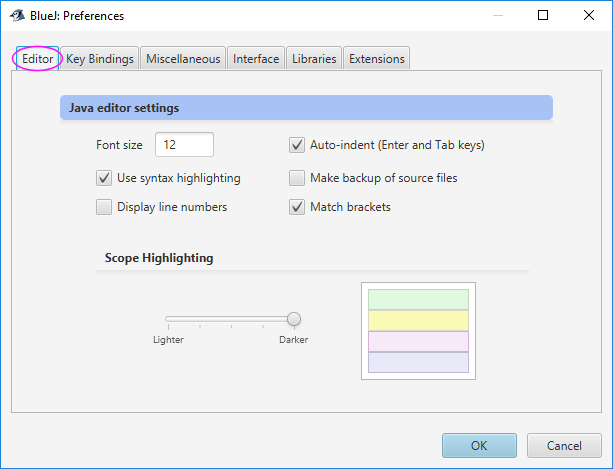
- The Editor panel sets options which apply when you're editing Java files
(this will be explained later).
- We recommend leaving the default editor settings
for now but you may wish to alter the font size later if you have difficulty
reading small print.
- Close the preferences window then use the Project pull-down menu to quit BlueJ.
BlueJ is now set up for your university computer account.