Cloud: Overview
Introduction
![]()
The School of Computing Cloud is a system that provides self-service virtual machines and storage directly to end users within the school. Virtual machines can be provisioned in seconds, can be easily rebuilt, and have direct console access when required. This is managed through a web interface, or a command line API, and doesn't require any direct interaction with the IT Team.
The system is based on OpenStack, supported by Ceph storage servers, and provides a standard OpenStack interface. We have the core components needed to provide virtual machines and networking, along with storage volumes and images, but not many of the additional OpenStack components.
New from October 2024
For this year we've completed an upgrade to OpenStack 2024.1 (Caracal). This is mostly a behind-the-scenes change with newer versions of software from the operating system, the virtualisation software, and the OpenStack interface.
However, we have added support for virtual networking. This allows the creation of virtual routers and subnets, and allows more complex network configurations to be created within OpenStack. Additionally, floating IPs are now also supported, which allows you to retain an IP address across virtual machine changes.
Requesting access
Access is limited to staff and students of the School of Computing, and is typically only be available where there are teaching requirements or specific project needs. For taught students this would usually be for final year projects or dissertations. Please contact us to discuss your requirements.
Getting started
Once you have access you will receive an email with a link to the login page and your password. After setting a new password you can log in here:
Note that the VPN is required to access this from off campus.
Here are some things to take note of before you get started:
SSH keys
To log in to virtual machine instances you will need an SSH key pair; passwords are not used (although you're free to set one once you've logged in to the instance for the first time). An SSH key pair consists of two parts - the private part which you retain and keep secure, and the public part which you can provide to other systems such as this one. When logging in to a system the server confirms that you have the matching private key for the public key it has before letting you log in. For convenience you may want to generate the key pair on a system that you can easily access and that can directly access your cloud instances, such as raptor or myrtle. Or you may prefer to keep the private key on your own machine, but you will need to make sure you use the VPN when logging in to your instance.
On a Linux system (such as raptor or myrtle), an Apple Mac, or other
Unix-like systems such as FreeBSD, you can easily make a key pair by
using the ssh-keygen command. The public key, by default, should be in
~/.ssh/id_rsa.pub on the machine that you ran ssh-keygen on. The private
part is also in ~/.ssh and will be found automatically by the ssh
client when needed.
On Windows systems you can use
PuTTYgen
from the PuTTY package. This performs the same task as ssh-keygen and
creates a key pair. The public key part is what you need to provide to
OpenStack. However, as above, you may find it easier to use PuTTY to log
in to raptor or myrtle and then generate the key there instead.
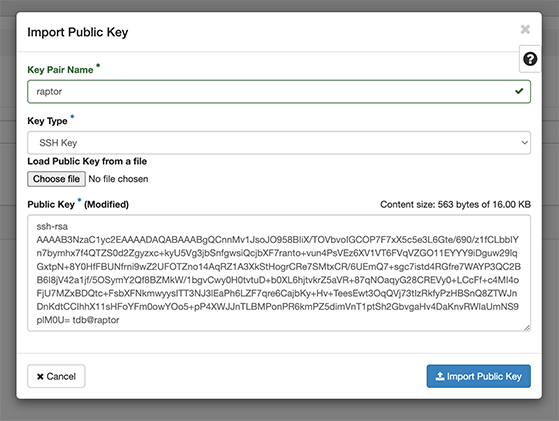
Once you have a public key you can add it to the School of Computing Cloud by visiting this page, or by navigating to the Key Pairs section under Compute. Click on "Import Public Key" at the top and paste your public key in to the third box. Use the first box to give the key a descriptive name that will help you remember which key it is, and select "SSH Key" in the second box.
Images
All virtual machine instances are launched from images. We've provided a number of cloud images for popular operating systems already. For all the current images the initial username is the lower-cased name of the operating system. For example, for the Ubuntu images the username is ubuntu. We would recommend that you use Ubuntu if you're not sure, since this will be consistent with what we run on raptor.
You can also upload your own images. Where possible these should be in RAW format. If they're likely to be of interest to others it might be worth asking us to provide it for everyone instead.
Please note that we are not licensed to run Windows.
Launching your first instance
Once your keypair is uploaded head over to the Instances page to launch your first instance. Here's a quick rundown of what to choose.
- On the Details page pick a name for your instance. This will also be the internal hostname for the virtual machine.
- On the Source page select the image that you wish to use. Press the up arrow button to the right of the name to select it. Use Ubuntu if you're not sure.
- The Flavour page gives a choice of different sized instances. Pick a
suitable one, probably
m1.smallfor your first instance. Also see the Quota limits section below. - There's only one choice on the Networks page and it will be selected by default.
- You can ignore Network Ports, but on Security Groups you will need
to make a choice. If you're not sure select
sshby clicking on the up arrow button next to it. If you're going to be running a web server you will want to selecthttptoo. - On Key Pair select the key pair that you created previously, which will be selected by default if you only have one key pair.
- For now you can ignore the Configuration, Server Groups, Scheduler Hints and Metadata pages.
- Hit the Launch Instance button.
After a few moments the instance will be created and booted. The Instances page will provide you with the status of the instance and its IP address. You can log in use an SSH client and the key you created previously. If the instance does not respond immediately, or you can't log in, please give it a minute or two to finish booting.

In this case you'd log in to 129.12.44.116 using the username ubuntu. If you're
doing this from raptor or myrtle you'd type ssh ubuntu@129.12.44.116.
Note that to access the instance from off-campus you will need to use the VPN.
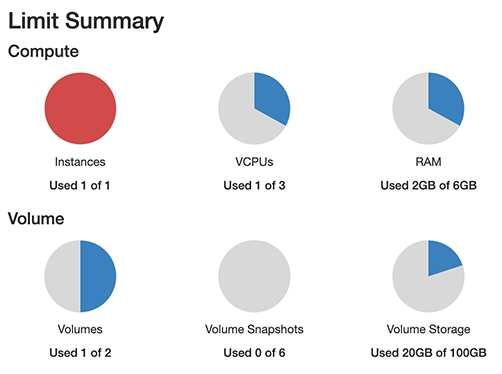
Quota limits
Projects on OpenStack (of which each user has their own personal one) have limits on CPU, memory, disk usage and more. Once you've used all of the quota that we've assigned to you, you'll no longer be able to launch any instances. Deleting unused instances will free up the resources for you to use. If you need more quota than we've provided please contact us to discuss your requirements.
Further reading
The School of Computing Cloud uses OpenStack which means most of the OpenStack documentation is directly applicable to our system. The OpenStack End User Guide is a good place to start to get a better understanding of how to use OpenStack.
Questions
If you have an questions or problems please contact us for advice.